Eastern Applied Research

  • Analyzer Sales
    • Coating Thickness >
      • Hitachi FT110A
      • Hitachi FT230
      • XStrata920
      • Hitachi FT160
      • Contact Gauges
    • Elemental Analyzers >
      • Hitachi EA6000VX
      • Hitachi EA1400
      • Hitachi EA1000AIII
      • Hitachi EA8000
      • Phthalates Tester
      • Bulk Analyzers
    • Handheld XRF Analyzers >
      • Alloy Tester
      • Xmet Video Demos
      • Sample XRF Report
      • XRF Rental Info
    • Used XRF Analyzers >
      • Available Used XRF
    • Other Technologies >
      • Handheld LIBS
      • Spectrophotometers: UV, NIR, FL
    • Mexico XRF Sales
  • Applications
    • Coating Thickness >
      • Common Coating Thickness
      • Ultra Thin Thickness
    • RoHS Testing
    • Analytical Labs
    • Alloy Analysis >
      • PMI: Alloy Testing
    • App Downloads
  • Service & Standards
    • Standards Laboratory >
      • New XRF Standards
      • XRF Standards Certification
      • Private Label Services
    • Instrument Services >
      • XRF Certification
      • Evaluation / Repair
      • Handheld XRF Services
      • Handheld XRF Spares
      • Xray Radiation Safety Inspection
      • Protection Plans
    • Accreditations
  • Technology
    • Tech Blog
    • What is XRF?
    • XRF Benefits
    • XRF Resources
  • Contact / About
    • Contact
    • About
    • Join the Team
    • Testimonials
    • Sales Policy

XRF Measurements of Small, Curved Surfaces

4/24/2018

0 Comments


​When choosing an xray fluorescence spectrometer for coating thickness measurements, be sure to consider the smallest sample area you will need to test. 

​You will need to choose the collimators on an XRF analyzer based on that sample area.  Curved surfaces can be especially difficult, so discuss those with an expert in x-ray fluorescence.​
XRF measuring curved wire and irregular sample
Looking at small wire, xray beam (in yellow) with proper collimator size in figure A versus the 'scatter' of too large a beam in figure B.
how XRF works with components of xray fluorescence
diagram of typical XRF analyzer component layout

​One of the options that buyers of x-ray fluorescence need to consider relates to the measurement area that they have to work with - 
the option in question is the collimator package of an XRF analyzer.

​Collimators focus the x-ray beam onto the measurement area, so the size of that area will affect what collimators should be included in an analyzer. Most XRF analyzers come with a single collimator or package of two, then offer a few optional collimators you may need to add. So, be sure to discuss the smallest possible sample area you may need to measure when discussing your xray fluorescence options. 
​
The typical rule of thumb is that the x-ray beam will spread to about 1.75x what the collimator is (a system with poly-capillary optics will change that). So, a 6mil collimator can be used for an area of about 11mil (Note: we try to work on 2x to be safe). In coating thickness measurements, the area will often be flat and large (ie nuts, bolts) so most standard collimators will work. However, if your sample is smaller than normal, or curved, then you need to review the collimator options closely. 

Specifically looking at curved samples, the XRF operator needs to be aware of 'edge effect' that can result in poor readings. Measurements of curved surfaces will be fine when a collimator directs the x-ray onto the center of a curved sample. However, if the collimator is too large then 'edge effect' will result in thicker readings because the sides are averaged into the reported thickness of the coating.

Depending on their size, measurements of cables and wires may actually require a rectangular collimator. The operator would want to line the sample up so that the longer part of the collimator runs along the length of the wire
.

The direction of the wire placement in the chamber is also important to note. Placement will depend on the location of an XRF analyzers detector tube. If the detector is located in front or rear of the collimator then you will want to place the sample in length wise front to back. If the detector is left or right of the collimator place the wire in side to side. The reason for this is because if you were to have a small misalignment with the top of the wire you could fluoresce more, or less, of the signal toward or away from the detector. Proper sample placement will limit this effect. Some systems, like the Hitachi FT110A, have a "locate center" function that uses micro steps of the XY table to scan the thin wire sample for the center point. This can remove the error potentially caused by an operator.

Of course, some measurement areas are so small that only a 
Micro-XRF analyzer can be considered. The Hitachi FT160 utilizes poly-capillary optics to provide one of the smallest measurement areas on the market (17um FWHM) and can be critical in accurately measuring samples like small solder bumps, BGA's, etc.

Discuss your sample sizes with specialists at Eastern Applied Research in order to confirm what collimators should be included on your next XRF analyzer. We can always run samples to confirm the right collimators are used to meet your testing goals.
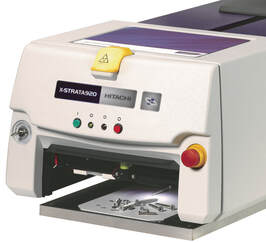
Hitachi X-Strata920 XRF for small samples
Hitachi X-Strata920 for small parts
0 Comments

Your comment will be posted after it is approved.


Leave a Reply.

    Archives

    March 2025
    January 2025
    November 2024
    October 2023
    June 2022
    April 2022
    December 2021
    July 2019
    May 2018
    April 2018
    February 2018
    July 2017
    May 2017
    January 2017
    August 2016
    February 2016
    July 2015
    June 2015
    September 2013
    March 2013
    November 2012
    July 2012
    December 2011
    November 2011
    July 2011
    May 2011
    April 2011

    RSS Feed

    Suscribe to our email newsletter

Suscribe

More news & Info

Blog
Contact Us
About Us
Accreditation
Proudly powered by Weebly